PC to Arduino: Serial BOF and EOF control codes

(First of all, I’ve tried to train myself to refer to the data sent over the serial port as ‘command codes’ but I always find myself lapsing into calling them ‘control codes.’ So I give up for today.)

Here’s what I send from processing:

          int outgoingbyte = 125;
          myPort.write(outgoingbyte);
          for (int i = 1; i<=cnum; i++){
               seg_calc(i);
               println(str(i-1)+"."+str(cc1)+"."+str(cc2)+"."+str(cc3)+"."+str(cc4));
               myPort.write(cc1);
               myPort.write(cc2);
               myPort.write(cc3);
               myPort.write(cc4);
          }
          outgoingbyte = 126;
          myPort.write(outgoingbyte);

And here’s how the Arduino receives it:

	if (Serial.available() < 1) {
          return;
        } 
        digitalWrite(13,HIGH);

	incomingByte = Serial.read();
        /*
        if (incomingByte == 125){
          digitalWrite(13,HIGH);
          delay(5000);
          cc_count = 0;
        }
        if (incomingByte == 126) {
          digitalWrite(13,LOW);
        }
        cc_count = cc_count + 1;
        cc_list[cc_count] = incomingByte;
        */

As you can see, I commented out most of the code here because it wasn’t working and I needed to test it. What the uncommented code does is turn on the pin 13 LED to confirm when serial data is received. And yes, the LED went ON, so I know that data is coming over.

Originally, however, the code was written to turn on the pin 13 LED when a value of 125 (= BOF = Beginning Of File) is received and turn off the pin 13 LED when a value of 126 (= EOF = End of File) is received. It wasn’t doing that.

So where am I? I know that data is going over the serial port, but apparently it’s not being read the same way it was written. Now I need to find out why, or find a way to work around the problem.

Posted in Uncategorized | Tagged , , | Leave a comment

PC to Arduino: Hello, are you still there?

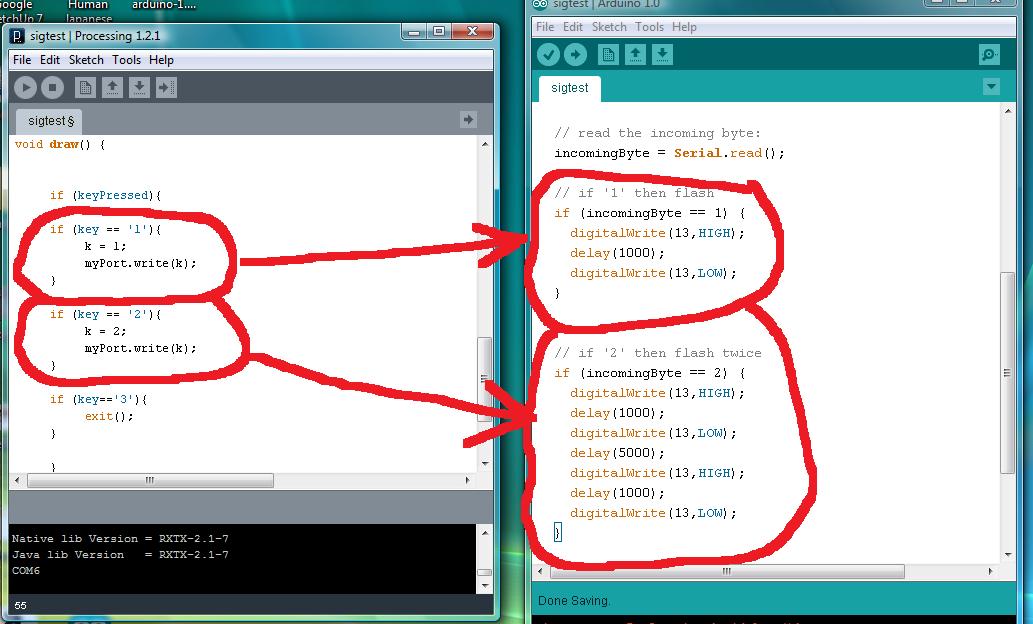
I wrote these two sketches to confirm that yes, serial port communication still works between Processing and the Arduino under the new Arduino IDE.

The sketch on the left is written in Processing and writes to the serial port. The sketch on the right is written in Wiring (that is, Arduino-ese) and reads from the serial port.

The Arduino pin 13 LED flashes once when the ‘1’ key is pressed, twice when the ‘2’ key is pressed. So yes, the Arduino is still reading serial from Processing.

(So whatever problem I was having the other day with GIRC, it’s not because of the new IDE. )

The Processing sketch could stand some improvement because when you press a key, it sends multiple bytes to the Arduino because human fingers are slow compared to computer keyboard reading speeds. The Processing sketch should just send one byte and wait for the key to be released. The fix should be easy, but these sketches have served their purpose and it’s time to get back to GIRC.

Posted in Uncategorized | Tagged , , , , | Leave a comment

Sending Serial Data from Processing to Arduino

I want to send data from my laptop to the Arduino-based robot. Processing is running on the laptop and Wiring on the Arduino. In Processing, the serial object is being called ‘myPort’ (it could have been called ‘Joe’ for that matter, but I decided to stick with the example in the book). This makes the command to send data: myPort.write().

On the Arduino side, the incoming bytes are recorded into a byte-typed variable called, imaginatively, ‘incomingByte.’ From there they are stored in a byte-typed array called cc_list[], for ‘command code list.’

A byte value of 126 is used to signal End of File (EOF). I could have used 127 but that’s just a string of 1’s and I worry that something might arbitrarily generate a string of 1’s and mess me up. When a 126 is received, the LED on the board will flash three times, signalling that all the data is received.

Well, I think this does it for sending the data, but I can’t be sure unless I can echo the data back to the serial monitor. And that is where I’m stuck . . . .

Posted in Uncategorized | Tagged , , , , , | 1 Comment

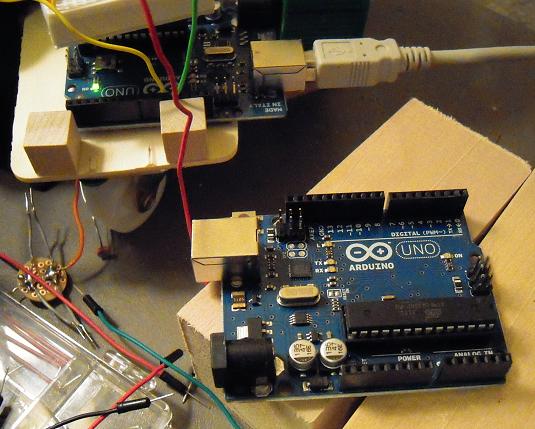
Buying an Arduino at Radio Shack

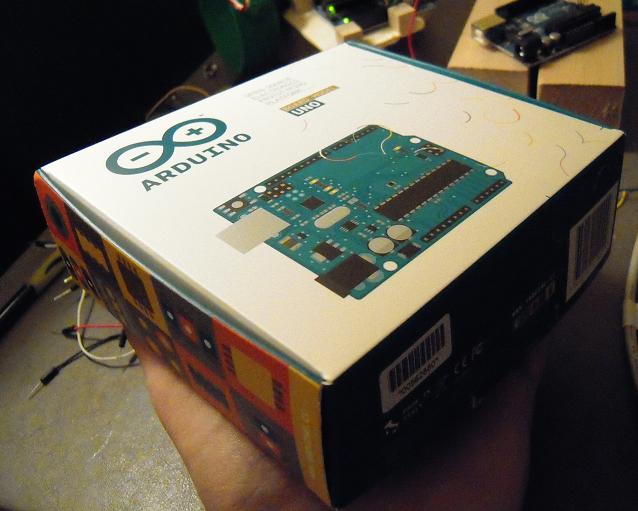
Ever since I was informed that Radio Shack was going to sell Arduinos, I’ve been swinging by the local store to check what they have in stock. Well, last night there was a Mega and a motor controller shield on display, which are relatively specialized applications for new users and I won’t be surprised if the store has trouble moving the merchandise. The basic Uno, which would obviously have the widest appeal to the masses of Arduino-neophytes walking in off the street, was nowhere to be found on display.

I asked the associate if there were any Unos around, and it turns out there was one under the counter that had been opened and returned. So I bought that. It cost $34, compared to mid-twenties for Amazon, but okay, I expect the convenience of retail to cost more.

“What does it do?” the clerk asked.

“It’s a microcontroller,” I said.

“Oh,” he said.

Well, maybe I should have elaborated. These days Radio Shack clerks are knowledgeable about cell phone contracts, not so much electronic components, though maybe that will change.

(And yes, the Arduino technically isn’t a microcontroller, it’s a prototyping platform, but I don’t think he would care enough for me to go back and apologize for my misstatement and explain the difference.)

As soon as I got home, I connected it to the USB cable — and got an error message on my computer saying it could not find the driver. More error messages followed when I tried to load the pin 13 LED blink sketch. I began to suspect why the unit might have been returned. It’s not defective, it’s just that there is a learning curve with respect to drivers and comm port assignments and all that (even the zip file format presented problems).

Anyway, after an hour of my bumbling around, it appears to work okay now.

Now as for the following comments, I admit that I’m only a customer, but then again, I am a customer and most businesses do care what customers think and I assume Radio Shack is the same way. So based on that qualification, here are some additional comments about the retail presentation:

The display box is very attractive, like a work of art, but (assuming the original purchaser didn’t fail to repack it for store return) there is very little documentation inside. I would recommend that the back of the box should specifically mention that getting-started documentation (and not just free software) is available at arduino.cc and that a USB A-to-B cable is required for connection to a PC.

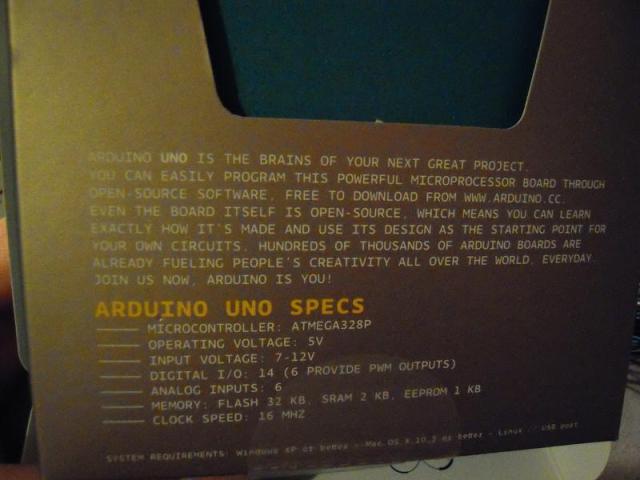
Keep the front and side box graphics by all means, but to enhance readability for those of us with weaker eyesight the printing on the back should be darker letters against a brighter background (or vice versa) — and please, not all capitals!

Well, decide for yourself:

As for shelf presentation, I would recommend that for now Radio Shack limit its Arduino display to:

1. The Uno.
2. The book Getting Started with Arduino.
3. A ‘starter kit’ containing a USB a-to-b cable, a mini breadboard, and a package of LEDs and resistors and flexi-jumpers to perform the examples in the book.

If sales volume builds, then expand the product line’s shelf presence of course.

Retail sales associates obviously don’t have the time to be trained in everything that a microcontroller/prototyping-platform can do, but they should at least be able to tell customers, “Oh, you can connect it to your computer and program it to turn on lights and run motors and read temperature sensors and things like that.”

Please note, these comments are offered in the spirit that having the Arduino at retail level is cool for hardware hackerdom. I’m happy that Radio Shack is selling the Arduino, and I hope that the endeavor is a success for everyone concerned. (And if someday my robot kits can get in on that success, that would be great too!)

Posted in Uncategorized | Tagged , , , , | 3 Comments

Arduino Pin 13 as low-res serial monitor

Now that I have data to send from the computer to the arduino, I’d like to verify that it has gotten to the arduino. My original assumption was that I could echo back the data and read it on the arduino serial monitor. Unfortunately, it appears that when a program in Processing is running the serial port, the arduino serial monitor capability doesn’t work.

My short-term solution is to have the arduino’s built-in LED at pin 13 serve as kind of a low-res serial monitor. When a byte value of 67 is received over the serial port, the arduino sketch writes pin 13 high. Why 67? It’s the last byte value in the path file that I wrote and am using for testing purposes.

Anyhow, when I transferred the data from the computer to the arduino, pin 13 did indeed come on:

This is an improvement over the null pointer errors that crashed GIRC when I initially tried to transfer data, but still I want to verify that all the bytes are getting over to the arduino. So that’s where I’ll be heading next.

Posted in Uncategorized | Tagged , , , , , | 1 Comment

GIRC: Reviewing Output in the Processing Console

After I generate a path and convert the data into turn-and-move format, I want to send the data to the arduino-robot. For this I will use the USB/serial cable. But before I send any data, I want to make sure I’m sending the right stuff.

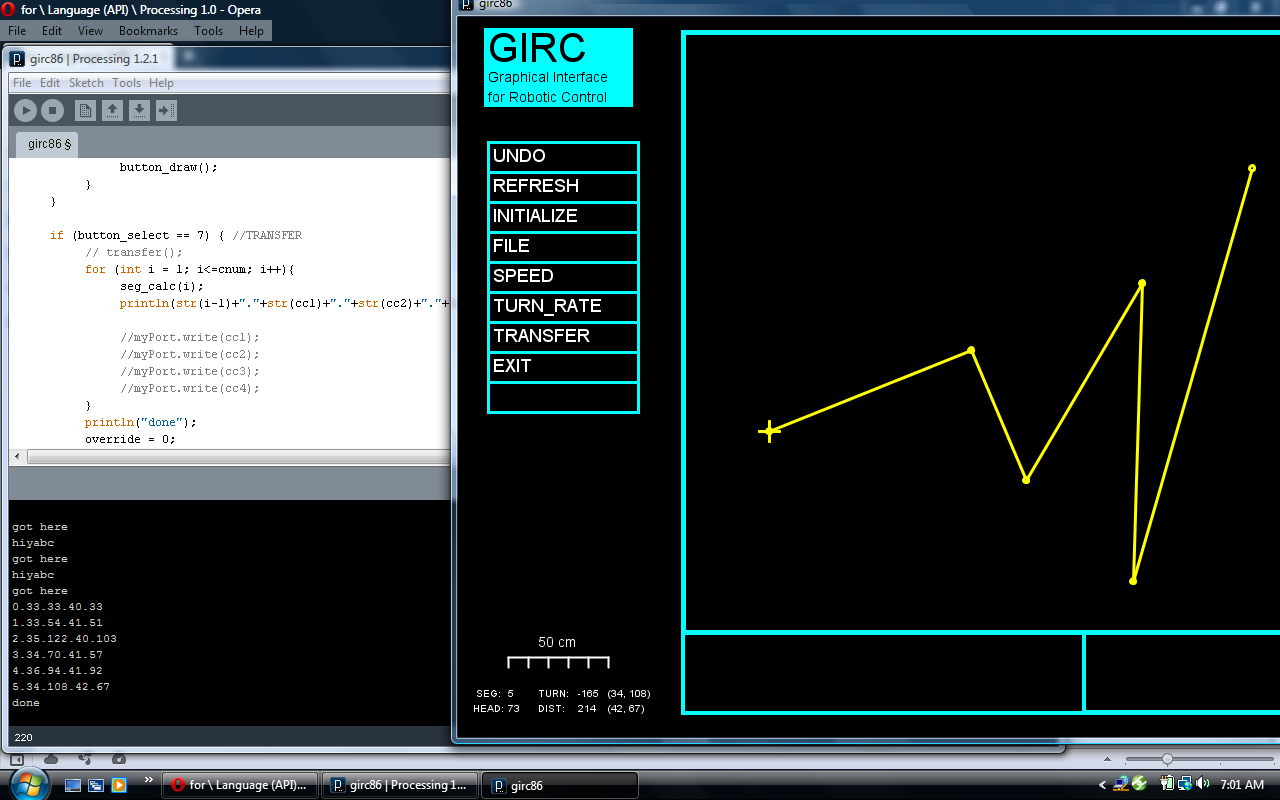
That is what the Processing “console” is for. The console is the black area at the bottom of the Processing window. It’s where you can print data from your Processing program in real time, so that you can troubleshoot.

In the above screen-capture image, the console appears in the lower left corner. As shown, GIRC is running and I’ve clicked Transfer. At this stage in program development, however, Transfer does not send anything over the serial port. Instead, it prints turn-and-move data to the console using the println() function.

As you can see, the last line in the console corresponds to the turn-and-move data shown in the lower left corner of the GIRC screen. I’ve checked all the other lines and they’re correct too.

Now it’s time to send data through the serial port.

Posted in Uncategorized | Tagged , , , , , , , , , | Leave a comment

GIRC Distance Commands

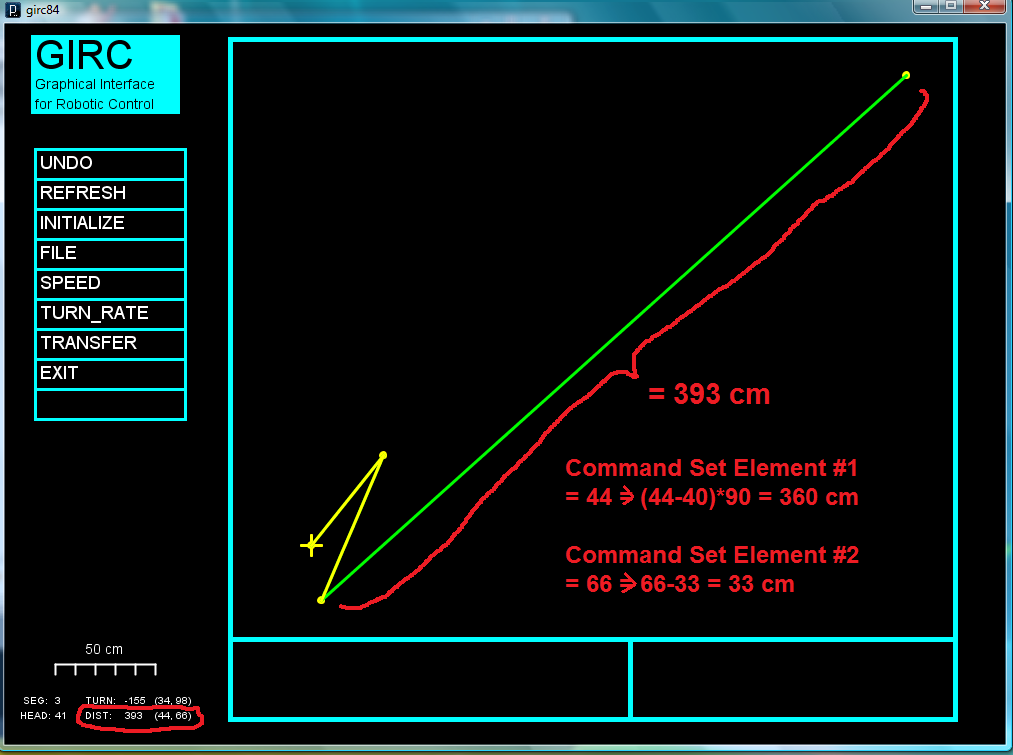
In the above illustration, the first Command Element has a command code of 44, which tells us that it is a Move command, and that we are to move 360 plus whatever is in the second Command Element minus 33. Why this bit of complicated arithmetic?

Ironically, to simplify things. First of all, I don’t want to send raw segment coordinate data to the microcontroller, because then to do the math calculations in the microcontroller I would have to load the floating point trig libraries into it and that would take up a lot of memory that I may want for something else. Second, I want to limit the data I send over the serial port to the printable ASCII character set between 33 and 127 in byte values.

So I do all the heavy math in the computer and then encode the path/segment turn-and-move data into a format of a series of bytes ranging in value from 33 to 127. The convoluted but simple arithmetic can then be done by the microcontroller to convert back to the actual turns and moves.

Posted in Uncategorized | Tagged , , , , | Leave a comment

GIRC Turn Codes

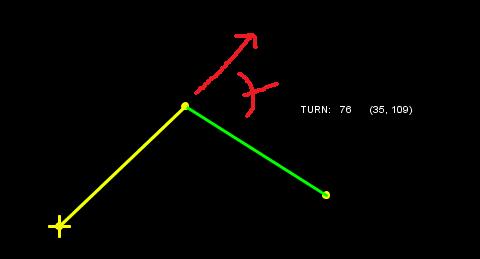
Here we make a 76 degree right turn in GIRC, and this information has to be sent over the USB/Serial cable to the microcontroller aboard the robot. This communication is done with a control code pair. As shown, the first control code specifies that the turn is to the right and less than 90 degrees. The second control code gives the amount of turn in degrees plus 33.

Why add 33? So that the ASCII value represents a printable character. I don’t want to have any hassles sending data through the serial port or reading a path data file in Notepad.

If the turn is greater than ninety degrees, the first control code changes and the second control code is the value of the turn less 90 plus 33, or less 57.

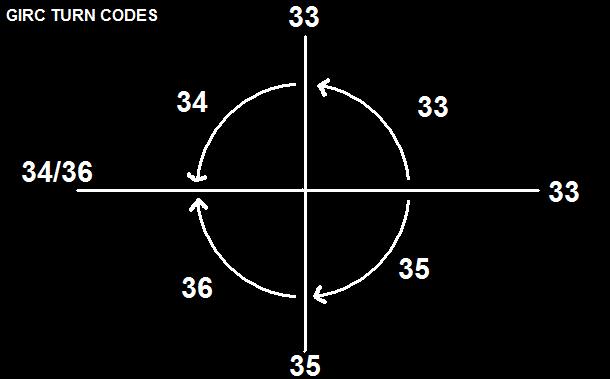
Here are the turn codes for the quadrants and axes:

Note that since left turns are negative values, the absolute value is taken and different control codes are used to distinguish from right turns.

Okay, so as seen in the first image, the numbers in the parentheses are what the robot sees for turn data. Now onto distance!

Posted in Uncategorized | Tagged , , , , , , | Leave a comment

GIRC Path Data Conversion

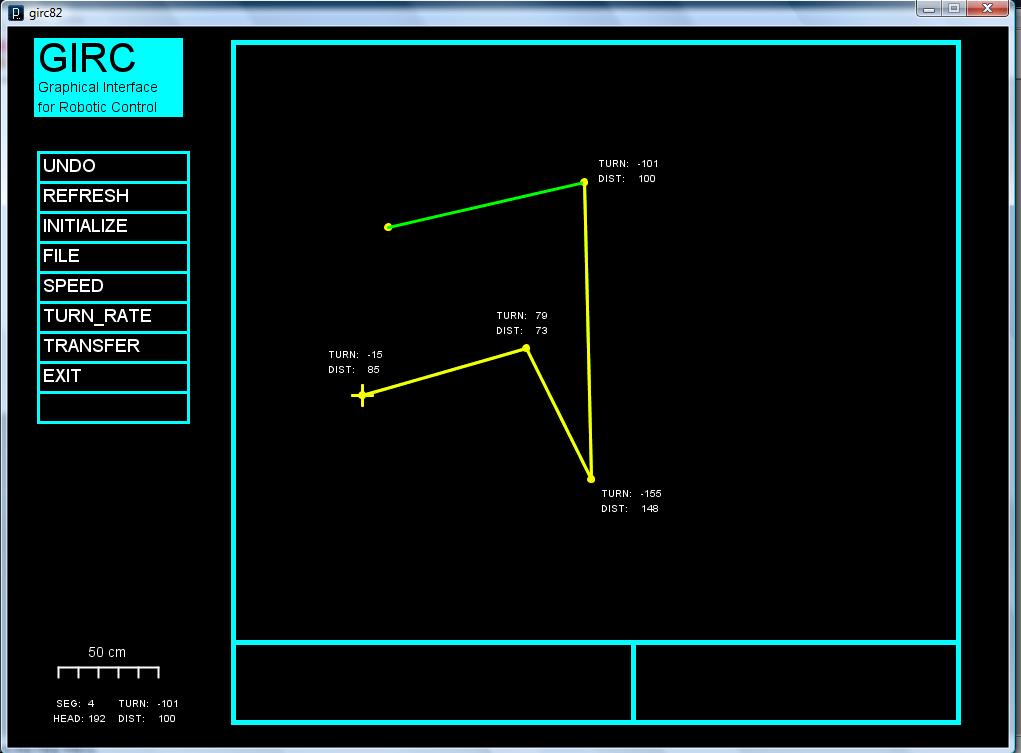
The user inputs path data to GIRC by clicking points on the screen. Processing then draws segments between the points and calculates x,y coordinate data. This data is then converted into distance and turn data which will then be sent to the arduino aboard the robot.

In the above graphic, right turns are positive and left turns are negative. No turn can have a greater absolute value than 180. Turn calculations are rounded to the nearest degree. Initial heading is assumed to be zero degrees = positive x-axis.

What does this mean for the robot in practice? As an example, for the fourth and final path segment, the robot will be instructed to turn left 101 degrees, then travel 100 centimeters.

Now I can start work on sending the converted path data as commands to the robot over the USB/serial cable.

(NOTE: Data printed next to the points on the screen is for illustration purposes only. In real use, the data only appears in the lower left corner.)

Posted in Uncategorized | Tagged , , , , | Leave a comment

Five Stages of Programmer’s Grief

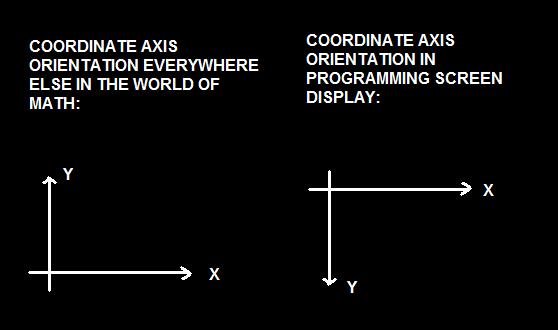
I knew this, but I forgot it yesterday when I was working on GIRC. This convention of inverting the y-axis for screen display isn’t peculiar to Processing, it’s common to many programming languages. There is a way to change the convention at the outset of a program, but I don’t know if I want to mess with that.

Anyhow, I have the GIRC heading calculations correct now. (Or . . . do I?)

This experience has caused me to reflect on the Five Stages of Programmer’s Grief:

I. Oh, this will be easy!
II. Why is this so hard?
III. This is impossible!
IV. DOH! Of course!
V. That was easy!

First I have this flash of inspiration and in my mental image I don’t see all the steps, just the end result.

Then I get into the nitty-gritty of writing the program, and I realize I have to do this and that and the other thing and it’s two steps backward for every step forward and the effort rapidly becomes frustrating.

Then I get bogged down and come to a complete stop. The cause is hopeless, whatever made me think I could do it?

Then I find that there was some trivial bug that is easily fixed and everything runs smoothly. How could I have made such a mistake, and why didn’t it jump out at me the first time I reviewed the source code listing?

Finally, I’m done with the finished product, and I forget all the hard work, and it I congratulate myself on being so clever — though in the back of my mind I wonder if I’m losing it, because it took me so long to do it.

But then I blame the universe for not being able to calculate 6 x 9 correctly, and get on with life.

Posted in Uncategorized | Tagged , , , , | Leave a comment