
As I get older, it’s harder to read the color bands on resistors, and frankly, sometimes it’s hard to tell the oranges from the yellows and reds, the greens from the blues, and even the browns from the blacks. Taking out a multimeter, setting the controls, and fumbling with the probes and resistor leads is annoying.
So I thought, what if there was a little ohmmeter where you take a resistor, lay it on a cradle, and a display instantly tells you the value?
I did a search and found that several people have done Arduino Ohmmeter projects, but the cost of a dedicated Arduino board boosts the cost over $30. What I want to do is take the ‘naked ATMega’ off the Ardruino and make an ohmmeter that would cost less than ten dollars.
Realizing that analog input pins can be programmed as digital output pins (ie, D15 = A1, D16 = A2, etc.), I made the following schematic:
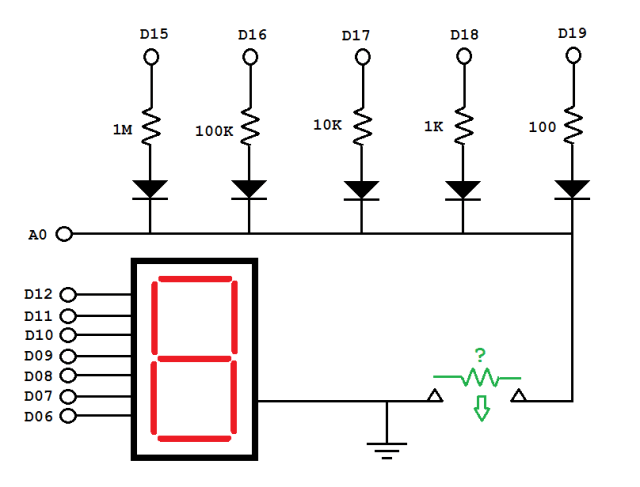
Here’s how it works. The resistor is placed across the terminals on the lower right. I envision a cradle for the resistor, and a pushbutton (not shown) activates the circuit. The microcontroller then puts a voltage on D15 which passes through the one mega ohm resistor, the diode, and then the unknown resistor. The voltage is read at A0.
If the reading at A0 is below 100 (on a scale of 0-1000 units corresponding to 0-5 volts), D15 switches off and D16 switches on. Now the voltage divider is through a 100K resistor. If the reading at A0 is still below 100, we switch to D17 and a 10K resistor, and so on, until we get a reading above 100 or until we get to D19.
At that point, using a formula that I need to work out (which may involve dealing with the internal resistance at A0), the microcontroller calculates the unknown resistance.
To save money, the output is a single 7-segment LED display. I figure the display will flash three numbers in sequence and mimic the bands on a resistor: first digit is first significant number, second is second, third is how many zeros. Thus if you see 4 followed by 7 followed by 2, it means 4700 ohms. To avoid confusion, zero zeroes is represented by ‘-‘ instead of a zero.
So here is the user experience:
1. User places resistor on cradle.
2. User presses button to activate.
3. 7-seg display flashes digit 1 for one second, digit 2 for one second, digit 3 for one second, followed by 3 second pause, then repeats twice.
4. Device automatically shuts off.
5. User removes resistor from cradle.
For a ‘cuteness factor,’ maybe this could be made into a little robot figurine.


Waddup Engineerzero,
Considered your method for my junior design ohm-meter project with ATMEGA324 microcontroller. Generally the method works well except that the voltage drop across the diodes are not ideal. The voltage drop across the diodes changes based on the known and unknown resistance values so it is very hard to predict what it will be. It turns out that the results fall just out of a 5% tolerance range. A good work-around to the diode problem is to replace gnd with 5V, and remove the diodes. Then apply 5v to all resistors except the one you want to read. Current would flow the opposite way but that takes away the non-ideal diode problems.
I think it would be possible to measure resistances with an ohm meter, then reprogram the ATMega to scale its values.