RGB display for timer

Today I spent some time thinking about possible simple products that I could market while I continue to work on my robot. One thought that came to mind was a color-coded illuminated egg timer. It would have an RGB LED inside a plastic egg shell, and would change in color from blue to red and then flash when time’s up.

Here’s the demo circuit with Arduino:

rgb photo

Here’s the schematic for the RGB hook-up:

rgb

And here’s the video:

NOTES:

1. To diffuse the LED light for this test, I made use of the bottom part of the prototype grisbot made from instamorph. In real life, I would probably use a molded plastic egg.

2. For demo purposes, the timing is cut short. I believe it takes three minutes to hard boil an egg. Perhaps there could be different color-coding for soft and hard boiled times.

3. Instead of an Arduino, an ATTiny would be used in the actual product. Output voltage on the Tiny is only 3V, so perhaps the resistors could be eliminated. A very clean design indeed!

Posted in Uncategorized | Tagged , , , | Leave a comment

VU Meter Blues

mic test

This microphone break out board does not work, maybe because it needs some capacitors and resistors. So next I’ll try the one that Sparkfun is offering.

BTW, I guess someone was in a hurry when they packed the box at Amazon because this is what it looked like when I opened it:

DSCN3411

Posted in Uncategorized | Tagged , , | Leave a comment

Flicker Object Detection

Can a small robot detect objects by flicking a light on and off? If so, then all I need to do in order to add object detection capability is add a small lamp to my robot at a cost of just over a dollar.

Here’s a schematic of the circuit (connections refer to Arduino pins):

light detect

Again,the idea is to flash the lamp on and off. The photocell compares the on/off readings and if there’s a ‘significant’ (TBD) difference in brightness caused by the lamp light reflecting off an object, the LED will flash to indicate that an object has been detected.

Here’s the test rig:

flicker assembly

(You’ll notice the photocell and lamp are in different physical positions than shown on the schematic. Kind of confusing, but it makes no difference in how the circuit operates.)

And here’s the test rig in action, in both dim and bright ambient light conditions:

If I can funnel the light using a foil cone or dish, it might be possible to detect the object at a distance of several centimeters. Also, when the beam is focused, the direction of the object might be determined with greater accuracy.

Posted in Uncategorized | Tagged , , , , | 1 Comment

A lamp for Grisbot

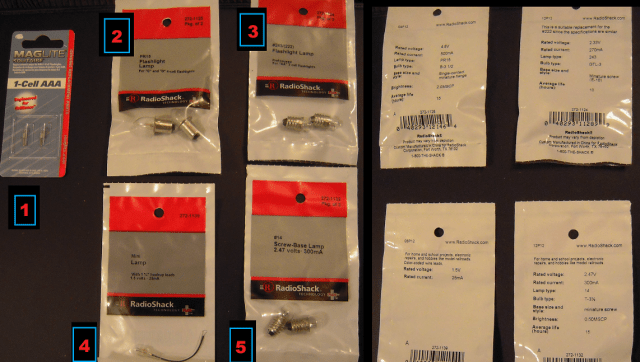
If Grisbot is to detect nearby objects by flashing a light on and off, it will need to carry its own lamp. So I went to Radio Shack and bought a few candidates. (NOTE: The packages shown on the right are simply the packages on the left after being flipped over in place.)

lamp choices 1

So which to use? I’ll have to experiment, but I thought it might be a good idea to run some calculations first.

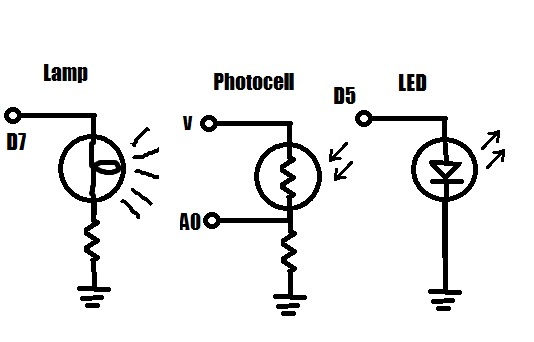
To do that, it’s necessary to consider the three points on the robot circuitry where the lamp can tap into voltage:

light taps

Point A is right off the battery. It’s a nine volt battery, but how much current does it provide? I couldn’t find out after a few minutes of searching (which included looking at a data sheet), so I thought, “Probably way more than enough.” So let’s leave it at that.

Point B is off the voltage regulator. The 7805 provides 5 volts and 750 milliamps according to an old reference book, which is what I put on the illustration but then I checked an online data sheet and it said 1.5 A. Progress!

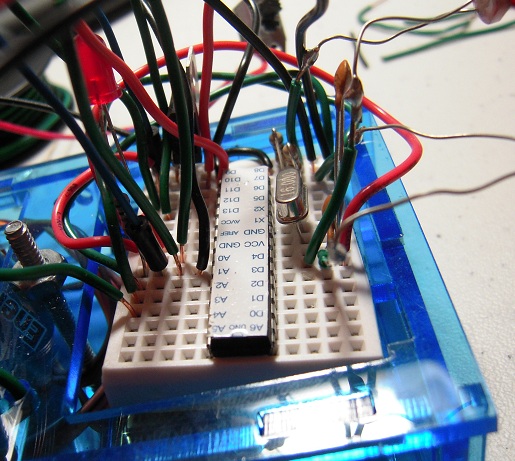
Point C is from a pin on the ATMega328 microchip, and the Arduino site states that this is 5 volts and 40 ma max.

So what does this do for me?

Lamp Candidate #1 looks interesting, although at a voltage rating of 1.5 volts it will require a current-limiting resistor in series if I tap it off a 5-volt chip pin. I didn’t see anything on the packaging about the current, though.

The rated currents for Lamps #2 and #3 and #5 are so high (500 and 270 and 300 mA respectively) that they would probably be very dim if I run them off the chip (Tap C), although off the 7805 is probably okay. Then again, I have two microservos drawing current off the 7805 already. Anyhow, I’d need to add a transistor to control any lamp upstream from the chip. Hence I prefer providing voltage at Tap C, since I can directly turn the lamp on and off from the pin.

That brings us to #4. This looks suspiciously like #1 in different packaging. Here there is a current rating on the package — 25 ma — which I assume applies to lamp #1 too. The current-limiting series resistor would then be 3.5v/25ma = 140 ohms.

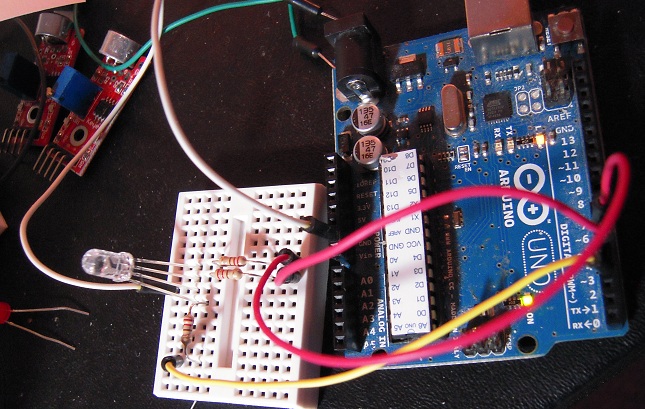
I’ll mount one of the maglite lamps on the robot breadboard and see if I can make it flicker without burning it out.

Posted in Uncategorized | Tagged , , | Leave a comment

Object detection by photocell

A photocell is a poor substitute for a camera, but it’s a lot cheaper too. So the question for grisbot is whether a photocell is sufficient to detect an object nearby.

Here’s one possible solution. Suppose an object — say, a ping pong ball — is in front of the robot like so:

pong1

The photocell registers a level of light, but has no way of knowing (yet) whether that level is simply ambient light (say, like from a window or lamp) or light reflecting off the ping pong ball.

But the robot has a flashlight mounted, which it now turns on:

pong2

If there was no object in front of the robot, then the light level detected by the photocell would not change. But the flashlight beam reflects off the ping pong ball in this case, which means that the photocell will detect a significant increase in light level.

I tried this out on the test bed with this program in the Arduino:

flashpong

The asterisks in the serial monitor output indicate that the current light level is a value of more than 50 above the previous value, which means that the flashlight beam is being reflected by a nearby object.

Imagine the robot conducting a sweep pattern, flashing a light on and off as it does so, and comparing light levels from one fraction of a second to the next. When it detects a significant difference between on/off measurements in the same direction, it knows that an object is in that direction.

And so, a robot with an ATMega328 brain and photocell eyes just might be able to herd ping pong balls, which would be another fun capability I could add to grisbot.

Posted in Uncategorized | Tagged , , , , | Leave a comment

Business Lessons from Chocolatier

chocolatier

Chocolatier is a business strategy simulation game where you are a chocolate maker in the nineteenth century. You travel around the world gathering ingredients and recipes, then have your factories make the chocolates, which you then travel around the world to sell. I played the game last night and I think I learned something about business in general from it.

First of all, I nearly went broke by trying to trying to maximize production of basic chocolate bars. It turns out that chocolate market is volatile, and sometimes the selling price for an item will be below what the item costs to make. Basic chocolate is a money maker at first, but later declines in price.

My next thought was, “Aha, the more complicated and expensive something is to make, the higher the profit margin!” Well, no, because again the market is fickle. People don’t care about how complicated something is, or how expensive it was to make, it’s whether they like it or not. That determines price and thus profit margin.

To do the game right, I realized that I would need to keep track of prices for ingredients and products. I would have to track historical prices and make sure that I wasn’t buying ingredients at too high a price. When ingredients were being offered at a low price, it was time to buy in bulk. Then I would have to calculate how much it cost to make items versus selling price at the current market. To do the game right, in other words, you need to set up a spreadsheet, or at least write things down on a piece of paper.

It’s a casual game, so you can make money just by cruising around and enjoying the sights. Real life, however, isn’t so forgiving. Chocolatier has gotten me to thinking that I need to be more analytical in my approach to business. I need to offer not just one inexpensive product but a complete product line, keep track of costs to make the products, scope out the market so that I know where and when to buy and sell.

But in the game, as in life, business really comes down to having something to sell that people want to buy. To me, the biggest business lesson of all is that customers buy products, not marketing strategies. Surprising how many companies forget that.

Posted in Uncategorized | Tagged , , | Leave a comment

Rewiring to streamline reprogramming

rewiring

Each time I re-program Grisbot, I have to move the ATMega328 microcontroller chip from the robot to the Arduino platform and then back again. It was difficult to pry the chip on and off the breadboard each time because several wires (GND, 5V, analog pins) arched over the chip and every time I moved my fingers near a wire, there was the danger of jostling the connection and then having to spend up to an hour trouble-shooting the resulting problem.

As you can see in the photo, I have tried to streamline the reprogramming process by rewiring the breadboard so that now the wires go around the breadboard rather than above the chip.

The re-wired circuit worked at first, then mysteriously stopped working after I removed and re-installed the chip. That makes no sense — why would it fail only after there are no wires above the chip to jostle? Anyhow, after an hour of trouble-shooting I got it to work again.

I come away from this experience with the realization that the wiring is still a mess, which is another problem that must be addressed.

Posted in Uncategorized | Tagged , , , , | Leave a comment

Grisbot in Solidoodle

sd 1

The Solidoodle 3D printer is selling for only $499, which means that it is within my budget. So that got me to thinking that maybe I should abandon laser cutting in acrylic and instead go with 3D printing in ABS plastic. An hour or two of tweaking in Sketchup (which is compatible with Solidoodle, I understand) yielded the above design.

This is the part that would actually be printed:

sd 2

And this is how it compares sizewise with the laser-cut grisbot body:

sd 3

Now, there are a lot of things to consider here. The part as shown has some overhangs, and I don’t know if Solidoodle can handle that. I’ve given the walls a default thickness of 3 mm, but I don’t know if that’s realistic or not. And at over $20 a pound for ABS on a spool, can I afford to make this at a reasonable price to the market? And just how long would it take to print out this piece?

The part has a footprint of 60 x 30 mm, and at z-axis resolution of .1 mm, a thickness of 3 mm would require 30 layers. So at an extruder speed of 50 mm/sec, I calculate that it would take 20 minutes to print the base. How that would translate in printing everything else, I’m not sure. But let’s say half an hour.

In a sixteen hour day, then, I could print 30 of these. If I make $5 on each robot sold, then I would get enough profit to pay off the investment in the printer in less than a week.

These are all seat-of-the-pants calculations, but it seems conceivable that Solidoodle is the answer to my robot-enclosure problem.

Posted in Uncategorized | Tagged , , , | 1 Comment

Informal Testing of Potential Ideas

DSCN3255

Tonight I tested out a couple ideas for where to go next with Grisbot.

On the right, I was working with the good old photocell testbed, which I connected to Arduino analog input A0 and measured the light reflected off a ping pong ball. It turns out that an LED light source barely registers, even if the LED is labeled ‘ultra bright.’ However, next to the ping pong ball in the photo is a small blue LED flashlight, which illuminates the ping pong ball enough to register a very significant and measurable change in intensity at the A0 input.

Okay, so you’re wondering, “Why is he measuring light reflected off a ping pong ball?” Well, my idea is to have the robot search for ping pong balls and herd them into a ‘corral.’ The robot would carry a light and when it approaches a ball, the light reflects off the ball and registers on the photocell inputs. Then commences the corralling procedure.

My second idea, involving the setup on the left, is based on something that Meredith of Big-Brained Superheroes suggested at the Seattle Robotics Society meeting on Saturday: using sound to control the robot.

I have a microphone module on order from Amazon, but it costs around $7 and that’s kind of pricey unless I offer it as an option. In the meantime, I idly wondered what would happen if I took the microphone and just used a paper cone rather than an op amp to magnify sound. It seems to make a difference, but I’ll have to experiment some more.

We’re not looking for speech recognition here, but rather just to get the robot to turn toward a noise or distinguish between one whistle and two.

At any rate, I still have about 75% of the ATMega328 chip memory open for additional programming, and every new feature helps toward being able to sell grisbot as a kit.

Huh, I wonder if I could use voice activation to guide Grissy into herding ping pong balls?

“That’ll do, bot.”

Posted in Uncategorized | Tagged , , | Leave a comment

ATTiny44 / Arduino programming pin connections

The MIT High-Low Tech tutorial on using an Arduino board as an ATTiny programmer has a diagram for connecting an Arduino to program an ATTiny45, but not for programming an ATTiny44. So I cross-referenced the corresponding SCK, MISO, and MOSI pins with the package pins, and came up with this:

attiny44-arduino

That is, connect Arduino pins 10, 11, 12, and 13 to the ATTiny44 package pins 4, 7, 8, and 9 as shown. Ground goes to ground, and the Vcc pin on the Tiny connects to the 5-volt pin on the Arduino power header. (And of course, when I say ‘Arduino pin’ I really mean ‘Arduino header hole,’ but you knew that!)

I tested this with an ATTiny44A-PU and got an LED to blink, so I think this is good. I haven’t tested an ATTiny84, but assume it’s the same thing. Let me know if there are problems.

Posted in Uncategorized | Tagged , | Leave a comment